


Installation Guide – Block
Getting Started
Introduction
Before installing the plugin you must have installed DivTag’s Theme on your Weebly. Watch our video tutorial on How To Install DivTag Templates.
Open W Theme Editor
After you have installed DivTag’s theme, you can now start to prepare to install you plugin. Follow these steps to open the W Theme Editor.
Click here to log into your Weebly account and to open up the W Theme Editor.
NEW EDITOR

OLD EDITOR

Click to enlarge image for more detail
How To

The Block Header Plugin have 5 sections to install into your Weebly website. In your download package you will see this:
We will be inserting the images, js files, css codes, html codes, and script code to set up your block header
For Written Installation Guide – continue below.
For Video Installation Guide – click here
Insert HTML Codes
Step1: Find HTML Insert Location
 The first thing we will start with is to insert the HTML codes.
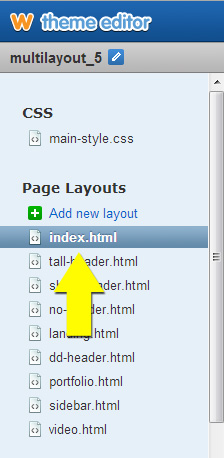
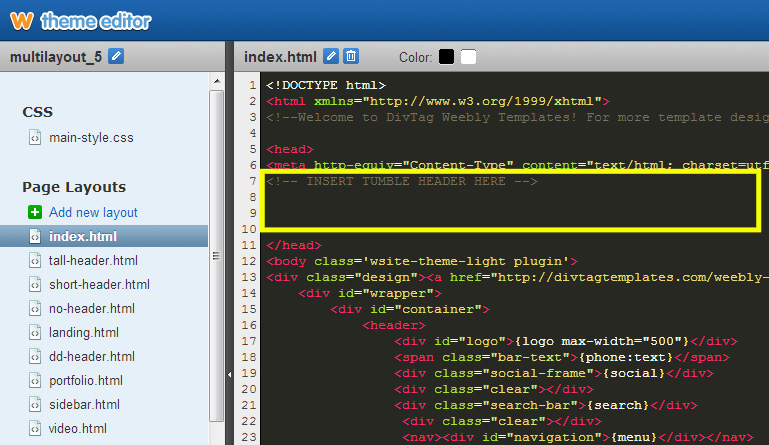
1) Click into “index.html” to open the Plugin Page Layout HTML editing page
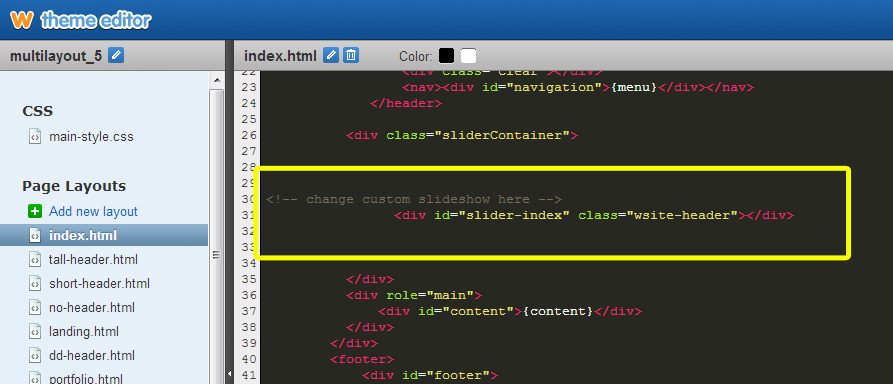
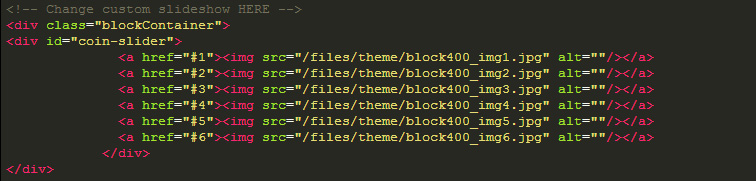
2) In the index.html page, locate this comment that show you where the Block Header HTML codes should be inserted.
<!– change custom slideshow here –>

Step2: Copy Block HTML Codes
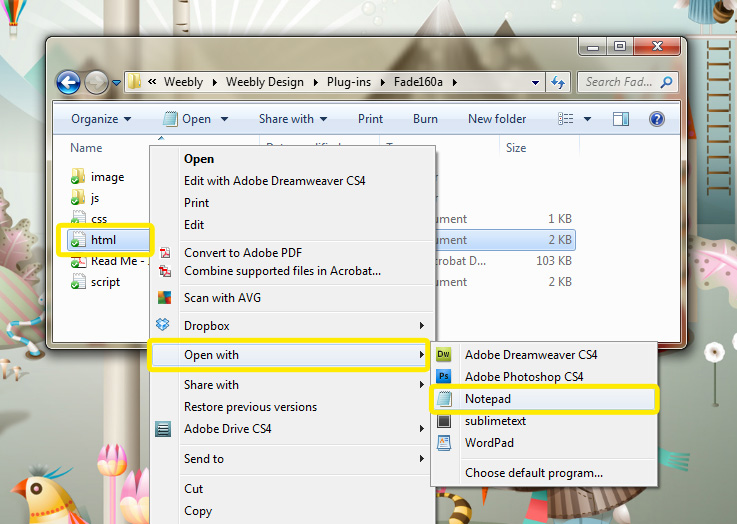
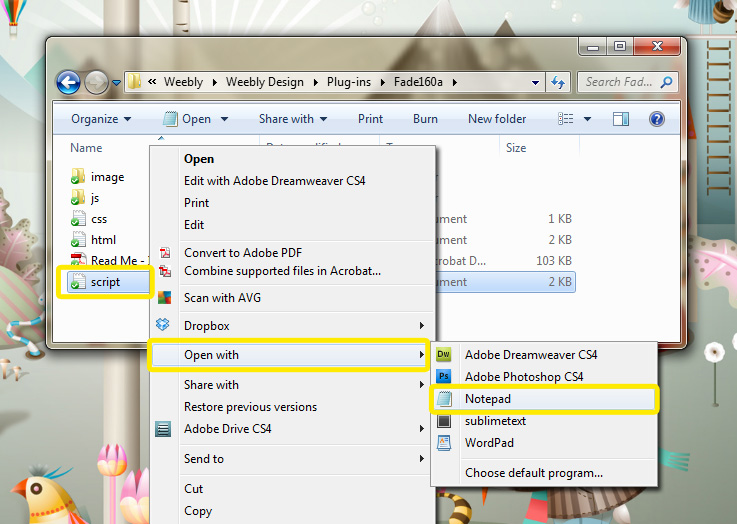
- Open the “HTML” doc in the Block Download Package using NOTEPAD (for MAC user, please use TextEdit)
- Select ALL codes inside the file by “right-click” and choose “Select All“
- Copy all selected codes by “right-click” and choose “copy“
Step3: Paste Block HTML Codes
Use your mouse and highlight the entire line of code that’s directly below
<!– change custom slideshow here –>
(It’s the yellow highlighted box in the image below)
The content inside the yellow highlighted box may look different from what you are seeing, but that does not matter. Just highlight the entire line, and paste the HTML codes you just copied over it.
Effectively, you are deleting the entire line below <!– change custom slideshow here –> and replacing it with the new HTML codes you just copied.
BEFORE:

AFTER:
IMPORTANT NOTE: Make sure you only replace ONE line of code. If you select more than the single line of code directly below <!– change custom slideshow here –> you can delete important codes that allow the template to function properly. If after the plugin installation, you no longer see the drag & drop content area and/or footer, you may have deleted more codes than you should. In this case, re-install the template and start fresh.
Insert Script Codes
The second part of the installation process is to insert the script codes. The scripts codes are there to link the js files to the template so the plugin will work. If the script code is not installed, the header plugin will not move.
Step1: Find the Insert Location of Script Codes
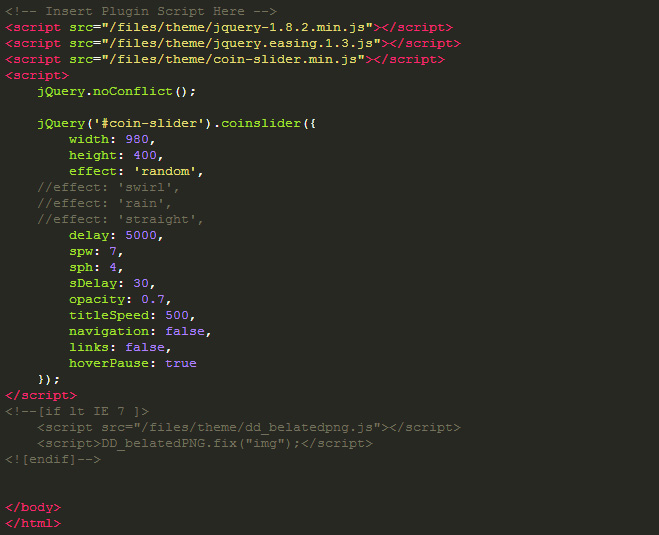
Near the bottom of the index.html page, locate this code:
<!– Insert Plugin Script Here –>
Step2: Copy Block Script Codes
- Open the “Script” doc in the Block Download Package using NOTEPAD (for MAC user, please use TextEdit)
- Select ALL codes inside the file by “right-click” and choose “Select All“
- Copy all selected codes by “right-click” and choose “copy“
Step3: Paste Block Script Codes
Replace the line of code DIRECTLY below <!– Insert Plugin Script Here –>

Before
After
Insert CSS Codes
The third part of the installation process is to insert the CSS codes. The CSS codes apply the styling of the plugin. If the css codes are missing, the plugin will be out of place and have awkward design.
Step1: Find CSS Insert Location
 The first thing we will start with is to insert the CSS codes.
1) Click into “main_style.css” to open the template css editing page
2) In the main_style.css page, scroll to near the bottom of the page till you find this comment:
/* ——————————————————————————-/
PLUGIN AREA – ADD YOUR PLUGIN CSS CODES BELOW
/ —————————————————————————— */
/* plugin for index.html start HERE */


Step2: Copy CSS Script Codes
- Open the “CSS” doc in the Block Download Package using NOTEPAD (for MAC user, please use TextEdit)
- Select ALL codes inside the file by “right-click” and choose “Select All“
- Copy all selected codes by “right-click” and choose “copy“

Step3: Paste Block CSS Codes
Locate the line of code directly below /* plugin for index.html start HERE */ (see yellow highlighted box in the image below), highlight the line of codes entirely with your mouse, and paste the CSS codes you just copied over the entire line.
Effectively, you are deleting the entire line and replacing it with the CSS codes you just copied.
BEFORE:

AFTER:

Upload Files & Images
Now that we have all the codes inserted we will need to upload the image files and js files for the plugin. The js file is what make the plugin move. Without them, the plugin will only have static images.
1. Click on “add new file(s)” to open upload window

2. Open the “Image file” folder within the download package and select ALL the image files inside for uploading
3. Wait a few seconds for the image files to upload. The blue uploading status bars will disappear when the uploading process is complete.

4. Open the “JS file” folder within the download package and select ALL the image files inside for uploading
5. Wait a few seconds for the image files to upload. The blue uploading status bars will disappear when the uploading process is complete.

Customization Guide: Prepare & Upload Custom Image
The plugin has 4 versions. It is important to prepare your images according to the Block Header version you are using.
Image file name and size for each Block version:
Block Tall
- block400_img1.jpg
- block400_img2.jpg
- block400_img3.jpg
- block400_img4.jpg
- block400_img5.jpg
- block400_img6.jpg
Image Size:
- 980px by 400px
Block Xsmall
- block730_img1.jpg
- block730_img2.jpg
- block730_img3.jpg
- block730_img4.jpg
- block730_img5.jpg
- block730_img6.jpg
Image Size:
- 730px by 300px
Block WideScreen
- block1400_img1.jpg
- block1400_img2.jpg
- block1400_img3.jpg
- block1400_img4.jpg
- block1400_img5.jpg
- block1400_img6.jpg
Image Size:
- 1400px by 400px
Block 550
- block550_img1.jpg
- block550_img2.jpg
- block550_img3.jpg
- block550_img4.jpg
- block550_img5.jpg
- block550_img6.jpg
Image Size:
- 1200px by 550px
**each numerical number indicates the sequence of images the Block Header will display. For example, “img1” will be the first image to be displayed by the Block Header, followed by “img2”.
1. Image size
This interactive Header plug-in supports 6 images. The sizes of the images will be different depending on the version of the Block Header you have selected. Above you will find a table that lists out the image sizes and image file names for all versions of Block Header. You can also find the image sizes and file names for your Block Header in “Plug-in Specs” in the “Read Me” document that comes with your product download package. We will need first need to edit your custom images’ sizes to ensure they fit in the Block Header.
To find out the sizes of your images, look at the “Properties” of your image files (right click on each image file, select “Properties”, and then click the “Details” tab). If your images’ sizes are not correct, you can edit your images in image editor like Photoshop OR free online image editors like Pixlr and Photoshop Online.
When uploading images in website it is always best practice to compress your image. This will help speed up website loading time. Before uploading the images, compress your images with Yahoo’s Smush it.
IMPORTANT: Make sure your custom images are exactly the size as indicated in “Plug-in Specs” or the table above. If your images’ sizes are wrong, the Header will not look as it is intended to look.
2. Image File Name & Format
The image must be saved in the JPEG format. If your image is not in JPEG format, you can use image editor like Photoshop OR free online image editors like Pixlr and Photoshop Online to change the format of the image by using “save as” and select “.jpg” as the file format.
After re-sizing your 6 custom images, you will now need to re-name each image file and save them in JPEG formats, as follows:
blockXXXX_img1.jpg
blockXXXX_img2.jpg
blockXXXX_img3.jpg
blockXXXX_img4.jpg
blockXXXX_img5.jpg
blockXXXX_img6.jpg
XXXX is a numerical and alphabetical code that indicates the version of Block Header you are using (see table above). Again, please consult the “plug-in specs” or the table above for the correct name.
3. Upload Custom Images
Click on “add new file(s)” to open upload window
Wait a couple of second after the blue upload bar disappear before proceeding to the next step
IMPORTANT:
Have you tried clearing up your browser’s cache? Sometimes browsers retain old temporary internet files / cache so when a person visits the website again, the site will load a lot faster.
Try clearing your browser’s cache and reload the website again and see if it helps. Here’s some information on how to clear your cache – http://www.wikihow.com/Clear-Your-Browser’s-Cache
Congratulation! You have completed the installation & customization of the Block Header Plugin
If you have any other questions, or want some answers for troubleshooting, you can find more answers in our Knowledge Base Wiki.
COMMON TROUBLESHOOTING TIPS:
1) Note that the Block Header will only be activated after you publish your website. So if you can’t see it working while you are still in Weebly Editor, it’s normal.
2) After you’ve published your website, and if you can’t see the Block Plugin, have you designated the webpage you are looking at as a Plugin Page Layout? For the page to show the plugin, it must be designated as a Plugin Page Layout. Find out how to designate a page layout here (click here)
3) After you publish your website, if your custom images are not appearing (still showing the old images), this is because you need to clear your browser’s cache. Sometimes browsers retain old temporary internet files / cache so when a person visits the website again, the site will load a lot faster. Here’s some information on how to clear your cache – http://www.wikihow.com/Clear-Your-Browser’s-Cache
Video Description:
This video will show you how to install your Block Header plug-in into your DivTag Weebly template.
Video Notes:
Block Header comes in 4 different version. Depending on the version you selected the image file names, and the image size are different. It is very important that you consult the “Plug-in Specs” located in the “READ ME” document. If the image file names and size are not correct, the Block Header will not upload properly.