Installation Guide – Installing Template
Welcome to DivTag template installation guide. Watch the short video below to see how to upload your newly purchased DivTag template into Weebly Editor. This guide will also show you how to select different page layouts for your webpages:
NOTES / TROUBLESHOOT:
- In the video (45 seconds in) we mentioned that you should click on “Select a Theme” button. You can also drag and drop the “Multilayout.zip” file directly into the box to start uploading the template. This works as well.
- If the upload process does not work right away:
- Try using a different browser and attempt again. For example, if you are using Google Chrome, try using Firefox browser to upload the template; or
- Try clearing your browser’s cache and attempt again. See how here.
Written Installation Guide
1) Download Package
Once you receive the email from us after you purchase our template, click on the link within the email to download the package.
Within the download package, there should be a file called “Mutlilayout.zip” (or a file that’s a zipped file). This is the template file that you need to upload directly into Weebly Editor.
Do NOT open or unzip this file, as you should upload this zip file “as is”.
2) Upload the Template Zip File
The Template Zip file (multilayout.zip) contains the html codes, CSS codes, and template images. DO NOT unzip or extract the Template Zip file. This zip file is to be uploaded into Weebly AS IS. Do not unzip it – this is Really important.
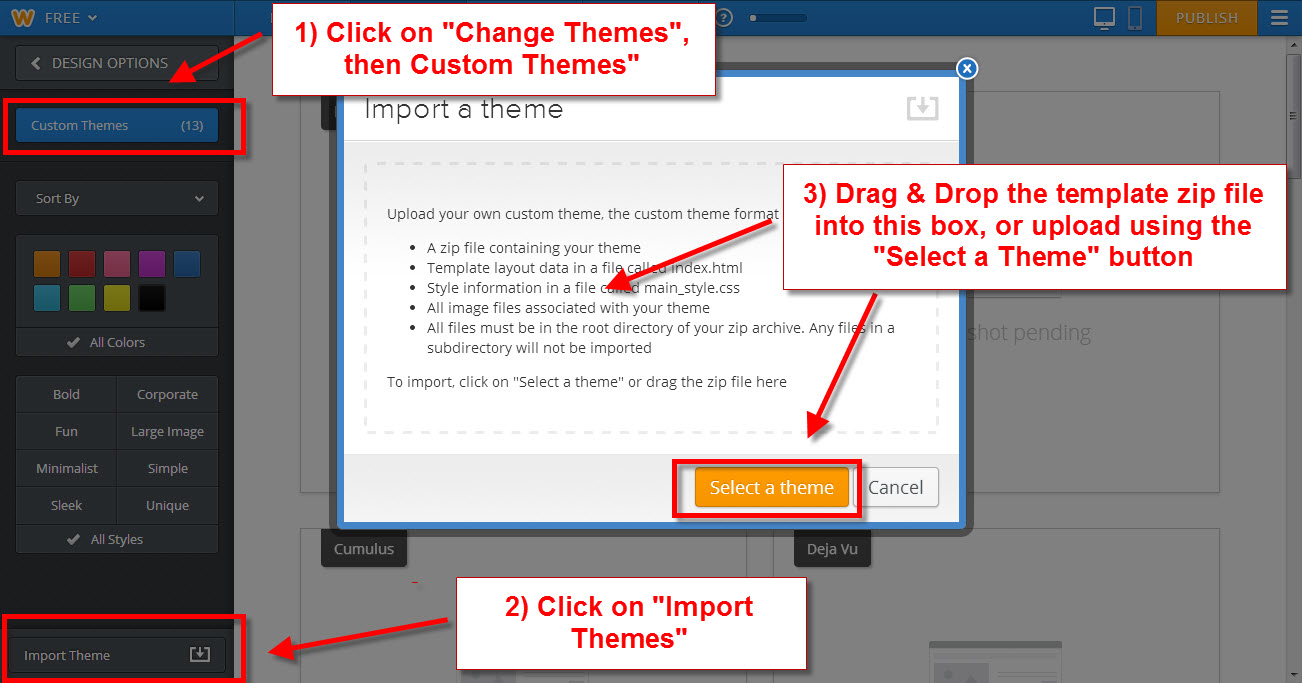
a) Log in to your Weebly account and click on the “Design” tab located on the top of the page.
b) On the left hand side of the Weebly tool bar, you will find a box labelled “Change Theme“. Click this.
c) On the left hand side of the Weebly tool bar, you will find a box labelled “Custom Themes“. Click this.
d) On the bottom left corner of the Weebly Editor, you will find a box labelled “Import Theme“. Click this.
e) In the popup window, click on the “Select a Theme” button. Select “multilayout.zip“, and upload the file into Weebly.
f) In the popup window, you can also drag and drop the “multilayou.zip” template file directly into the popup window.

3) Start Using the Newly Uploaded Template
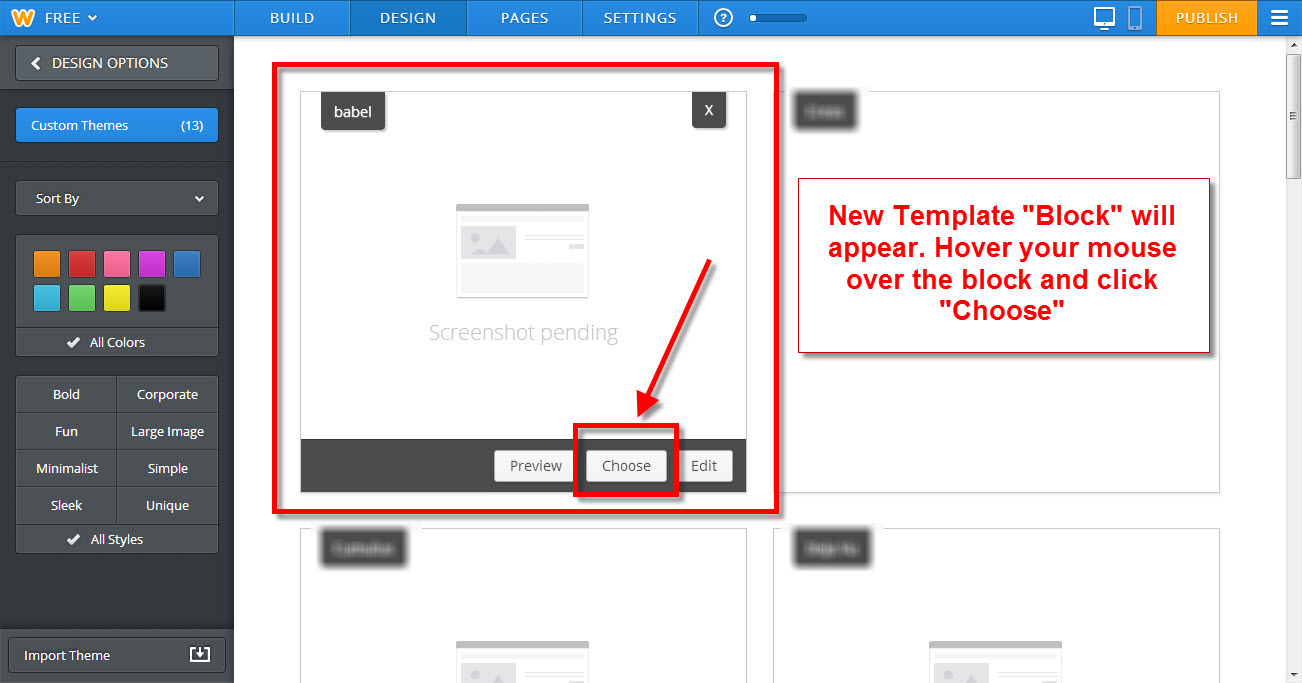
Once you have uploaded the file successfully, the new template “Block” should appear on the main screen.
Hover your mouse cursor over the “block” and a banner will appear on the bottom of the block.
Click “Choose” to set the template as your main template.

4) Pick Page Layouts Design for your Webpages

Depending on the template that you purchased, there could be up to 9 different page layouts you can choose from.
You can select different page layouts to use for different webpages (Video tutorial also below):
a) Click into “Pages” (you will find this button across the top of the Weebly Editor Menu bar)
b) Click on to the webpage you would like to edit (your webpages are listed on the vertical menu on the left hand side). Once your page is highlighted, click on a page layout block (as shown above) to set that page layout design for your highlighted webpage.
c) Repeat the process with every page till a layout design have been selected for all pages.
Note: if you do not select a layout design for a page, it will use the plugin layout as default (the page layout block that’s labelled “Index”. Plugin layout is ONLY used if you choose to add a separate header plugin to your website (which is sold separately).
** WATCH VIDEO ON HOW TO QUICKLY CHANGE PAGE LAYOUTS FOR YOUR WEBPAGES: **
5) Save & Publish
Click on “Publish” to activate your website!!


